Making wire wrapped jewelry
Making wire wrapped jewelry can be both fun and extremely rewarding when you can admire your finished piece. The raw simplicity of a bead wrapped in wire is what makes wire pieces so beautiful. It also allows you the freedom to get creative with twists, turns, and wraps. Why wouldn't you want to make pieces from wire?Whether you want to learn how to make pretty wire rings, how to wrap pendants, or how to make your own unique handcrafted clasps, this collection has a little bit of everything to easily get your feet wet in the world of wire jewelry making. Once you show off all of your new jewelry designs, your friends will be begging you to make them some original pieces as well.
Easy Wire Jewelry Tutorial
If you're just starting out, these wire wrapped jewelry instructions will help you make beautiful handcrafted pieces that your friends will be jealous of. Learn how to make your own clasps out of wire, simple wire hammering techniques, and an easy way to make your own ring base for all kinds of fun designs. There is no easier way to pick up some basics and get started!Copper Heart Necklace
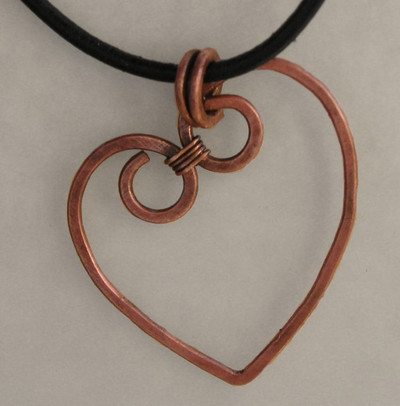
Don't you love the look of hammered wire jewelry? This Copper Heart Necklace is such a simple design, but so perfect. It's not only adorable, but does with any outfit because of it's neutrality and simplicity. You can't ask for anything more perfect. This is a basic heart DIY necklace design, but once you master this jewelry technique you can add embellishments to this wire jewelry tutorial. Learn how to make a necklace that is perfect a gift for Mother's Day, Valentine's Day, or any time you want to tell someone you love them.
Project Type: Make a Project
Bead Type: Wire
Time to complete: Under an hour
Bead Technique Used: Strung
Bead Project Type: Necklace
Difficulty Level: Easy
 Preparing the Wire

To start…. cut a piece of 16g wire 5 inches long, and file the ends so that they are flush. Then bend the wire using your chain nose pliers, so that one side is 2.25 inches, and the other is 2.75 inches.

Shaping the Heart
Now use the mandrel (ie: fat marker) to shape the sides of the heart. 16 g wire is a bit difficult to work with, so don’t get discouraged….! Start by holding the wire tightly on the marker, and then rolling (you are pushing – not wrapping!) the wire until you get a nice rounded shape – repeat for each side:

Shaped Heart Sides...
Once the sides are rounded (one side will be longer than the other), it’s time to turn the ends further inward, using the round nose pliers. It is very important to make sure that you don’t pull open the shape you just made on the mandrel! This may take a bit of practice since 16g wire is a bit difficult to work with.

Turning in the Ends
It is more effective to grasp the end of the wire tightly in the round nose pliers, and then PUSH the wire around the pliers, rather than trying to pull the wire, which will warp the shape of the sides and pull them straight.

Shaping the Heart
After you turn in the ends, you can shape the sides by PUSHING the ends toward each other, and gently pushing the sides out a bit, until it is the shape as shown on the right.

Hammering - the Final Shaping Step
Using a nice slightly rounded hammer and a steel block, flatten the heart frame – the ends may open a bit, and the sides may separate a little… that’s normal, you just need to tighten up the ends and bring the sides back together, as shown above. Next, we will use thin gauge wire to wrap the sides together, so the heart doesn’t open.

Closing the Heart
Cut about 4 inches of the thin wire (24g or 26g), and make a small hook at one end, then start to wrap the sides of the heart, as shown above. Wrap the wire through the loops on each side 3-4 times, and pull the wire taut, using your pliers as needed. Decide which side will be the front, and make sure that you pull the wire through, and cut both ends on the back.

The Wraps on the Back
The photo above shows the wraps neatly cut, and pressed down on the back… the only thing left is to add the bail, and hang on a chain.

Shiny... or Antiqued - Either Choice is a Winner!
I made a simple bail by wrapping a piece of 16g wire twice on the base round nose pliers, cutting and filing the ends, and hammering it a bit for texture. I then opened it and slipped it thru the loop of the higher side of the heart, so that it hangs balanced. Personally, I’m a fan of the antiqued look! If you have some wire wrapping skills, you may want to embellish the heart with additional wire wrapping, or adding some beads.

Bold Heart!
This photo shows a heart frame with spirals (the technique is similar), which is then wrapped with some faceted garnets…
Comments
Post a Comment